Using the Real Estate Simulator Management System (RMS)

Using and Navigating Through the Edit Info Section
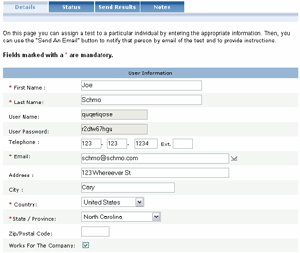
The Edit Info screen will allow you to acquire or edit contact information for your existing and prospective agents.
 |
- Click on a candidates' name from your main page or selected folder.
- Select 'Edit Info' from the list of options.
- The Edit Info page will allow you to access the details of a particular candidate.
View the individual’s contact details or update their information by entering new details and clicking on 'Update' to save the changes.
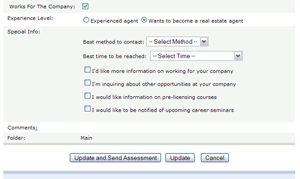
- If the candidate in question is looking to establish a career in real estate (non-experienced) then the details below the ‘Works For The Company’ option will allow you to identify additional details that will prepare you to initiate a constructive dialogue with the candidate.
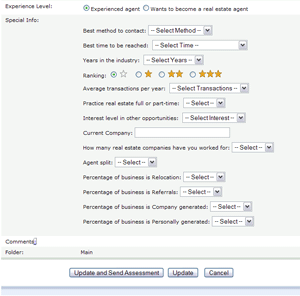
- If the candidate in question is already an experienced real estate agent, then the details below the ‘Works For The Company’ option will allow you to identify and track details pertaining to their experience.
- You can send or resend the assessment to this candidate by clicking on the 'Send an Email 'button.
|

Using and Navigating Through the Edit Status Section
The Edit Status page will allow you to keep track of your progress with each candidate in your database.
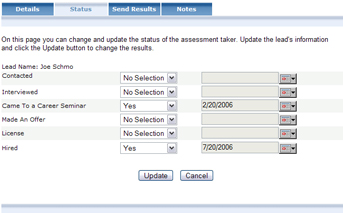 Track if your prospects have been: Track if your prospects have been:
- Contacted
- Interviewed
- Attended a career seminar
- Made an offer
- If they are licensed
- Hired
From the drop down menu for each of these options, select “Yes” for and accomplished task or “No” for an incomplete task
A date can also be associated with each of these entries.
To track additional information, you can keeps notes, up to 250 characters, in the notes section located at the bottom of the page.
Once all intended information has been entered, click on the 'Update' button to save the information.

Using and Navigating Through the Notes Section
The Notes page will allow you to keep track of your notes and history with each candidate in your database.
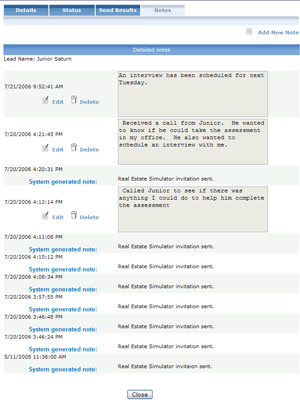 To track additional information, you can keep unlimited notes; up to 250 characters each, in the notes section.
System generated notes with a date and time stamp will also be found within the notes section. This opportunity will allow you to keep track of when the RES assessment has been sent, resent and completed.
Click on the ‘Close’ button located at the bottom of the page to exit this screen.

Using and Navigating Through the Send Assessment Section
The Send Assessment section will allow you to directly send or resend any candidate the assessment.
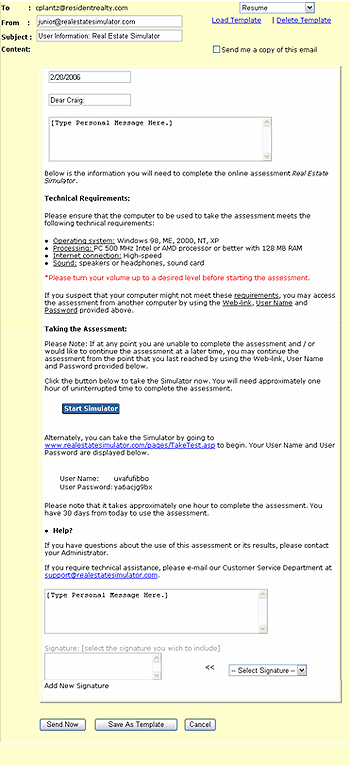
- Load Template if you do not have or know how to create a template click here
- Adjust the subject heading to suit your preference or leave it as is.
- Adjust the “From” field by changing the email address if you would like the assessment to come from you.
- Use the enter [Type Personal Message Here.] to customize the message that you would like to send to your candidate.
- In your message feel free to describe the process ex. How long the assessment will take to complete (approx. 45 – 60 min) or what will happen when they complete the assessment etc.
- Or select a template that you have already created.
- Use the [Type Personal Message Here.] box at the end of the email to wish your candidate the best of luck and ad your salutation. This portion of the message can also be added to your template.
- Select your signature from the signature drop down menu. If you do not have a signature or do not know how to create one click here.

Using and Navigating Through the Send Results Section
The Send Results Section will allow you to forward results to candidates once they have completed the assessment, and send the reports to others within your company.
Note: If the candidate in question is one that you are interested in we recomend that you do not forward results to them.
Instead invite them into your office to review their results. You can forward results to candidates that you are not interested in or as a follow up to an interview that has already taken place.
You can also use this opportunity to forward results to other recruiters or managers in your company who will be conducting interviews.
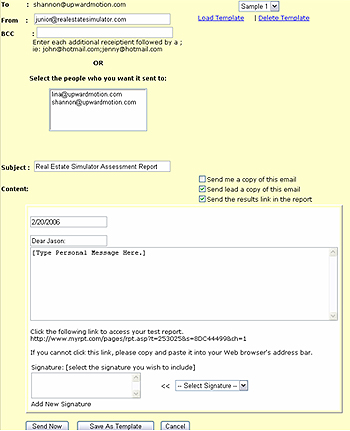
- Load Template if you do not have or know how to create a template click here
- Adjust the subject heading to suit your preference or leave it as is.
- Adjust the “From” field by changing the email address if you would like the assessment to come from you.
- Use the enter [Type Personal Message Here.] to customize the message that you would like to send to your candidate if you are not using a template.
In your message feel free to describe the next steps that the candidate will have to go through in your recruiting process.
If there is more than one individual in your company that is responsible for interviewing, you may want to forward a candidate’s results to another hiring manager within the company.
If this is the case, you can enter the email address of the alternate recruiter in the BCC field located at the top of the page.

 Please keep in mind when using this opportunity that you still may not want the candidate to receive a copy of their results. To ensure that they do not receive a copy of their results at this stage, uncheck the box that says “Send lead a copy of this email”. Please keep in mind when using this opportunity that you still may not want the candidate to receive a copy of their results. To ensure that they do not receive a copy of their results at this stage, uncheck the box that says “Send lead a copy of this email”.

Using and Navigating Through the Send Email Section
The Send Email Section will allow you to send your candidates' emails from your default email program. I.e. Outlook, AOL
This option will open up your default email program, simply allowing you to send a general email.

Using and Navigating Through Agent Categories
Your leads will automatically be segregated into two categories. Non-experienced for those candidates who have no real estate experience and Experienced for all the candidates that have real estate sales experience.

This filter will allow you to easily work and search between your non-experienced and experienced agents so that you can easily access the most relevant details quickly and efficiently.
Simply click on the category of your choice above the folders section of your database on the left hand side.
*Note: Folders that you create will apply to both categories of experienced and non-experienced agents. Only the leads within the category you are in will appear within the folder you select. Therefore within any particular folder you will not see a combination of non-experienced and experienced leads.

*Note: The category you are in can be identified from the heading above along with the folder you are currently using.
 Within the experienced agent category, you will be able to quickly view the number of years of experience as well as their perceived sales rank. You can adjust the sales rank by clicking on the appropriate star level for any particular agent. One star for a low performer, two stars for a moderate performer and three stars for a top performer. Within the experienced agent category, you will be able to quickly view the number of years of experience as well as their perceived sales rank. You can adjust the sales rank by clicking on the appropriate star level for any particular agent. One star for a low performer, two stars for a moderate performer and three stars for a top performer.
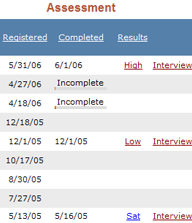
You will also be able to view the assessment results for an experienced agent that does not include the overall suitability score within the actual report. This omission will allow you to easily present the assessment results to a candidate without fearing that they will take offence to the results.
In addition to viewing the assessment results for the experienced agents, you will now have access to customized interview questions that are ordered based on the most critical needs of a particular experienced agent.

|
